Knowing how to pack a backpack for hiking and camping trips will make expeditions of any length easier and more enjoyable.
I’ve written before about how to choose a backpack and why getting it right is so important. It should be noted, however, that even the best backpack in the world – poorly packed – can make a hiking trip frustrating at best and disastrous at worst.
Packed efficiently, a backpack can absorb an extraordinary array of gear and make the load lighter on your back, shoulders and legs. Get it right and you can make the most of your time in the wild.
It’s worth making a list of what you need and laying out all your gear first. I’m a little obsessive about this and keep a spreadsheet with what I’ve taken on previous trips with the weight of the items included. A touch pedantic and, dare I say it, a bit sad but it works for me!
How to pack a backpack for hiking
Below, I take a look at how to pack a backpack for hiking and camping trips.
Pack light
After years of gradually honing my camping and hiking gear I’ve finally got it down to a manageable weight. My target weight is around 12kg (26lb). However, this can creep up to around 15kg (33lb) for longer journeys or winter trips when I need more food, specialist gear and thicker clothing.
Staying as light as possible is crucial. For summer hiking trips, I try to be as ruthless as I can when packing. If I’m unsure whether or not to pack it, it doesn’t go in. If it comes to it, I’m prepared to sacrifice my favourite gadgets, food and personal hygiene to keep my backpack weight to a minimum. Only the ten essentials are safe!
Pack dry
One thing I never leave behind are waterproof stuff sacks. A wet sleeping bag is about as bad as it gets and will make any hiking trip miserable. I usually take three stuff sacks with me: one for my sleeping bag and inflatable pillow, one for my clothing and a smaller one for any gadgets or electronic items I have with me.
The stuff sacks will also help you organise gear inside the backpack and keep things in one place. Even if your backpack has a waterproof cover (which mine does), I would still pack my gear in waterproof sacks inside. A rain cover won’t protect your gear for long in torrential rain or if you’re wading across a river.
Pack well

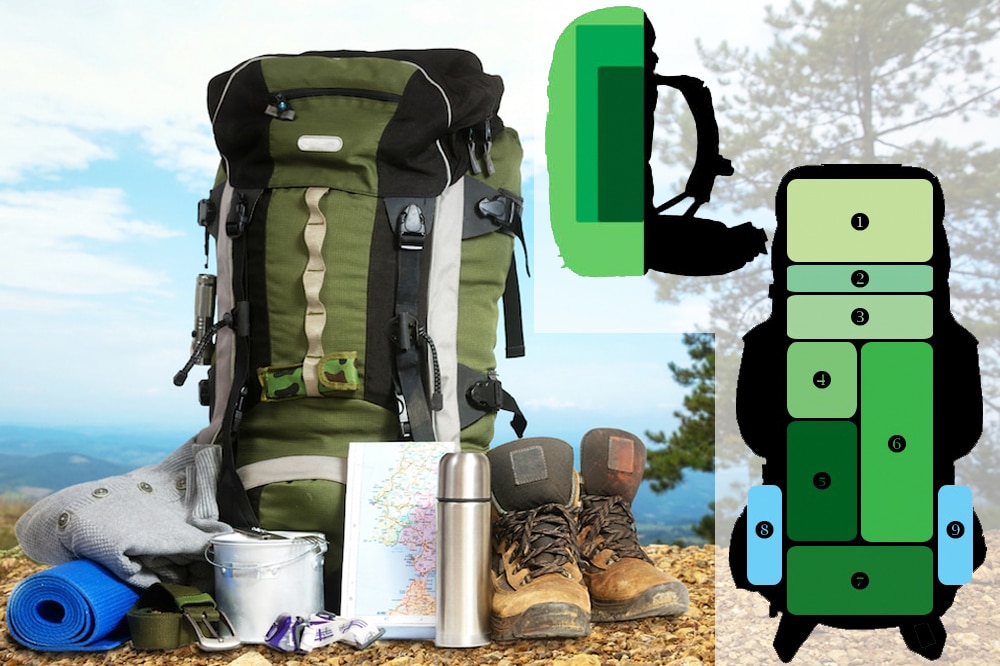
Always try to pack the heavier stuff closer to your back, getting lighter as you pack outwards. The below is a good system to use when packing your backpack for hiking trips.
The system can of course be adapted. For example, I sometimes pack my tent on the outside of my bag on certain trips as I like being able to pitch my tent quickly in bad weather before throwing my gear inside and crawling in – a year-round possibility in the UK . I spread the poles, pegs and sheets around to balance the weight.
Generally though, the below is a good start.
1. Ten essentials and personal items: Fill the lid of your backpack with all the things you might need during the day or in an emergency. This may include your first aid kit, snacks, sunscreen, head torch and camera.
2. Waterproof clothing: These need to be accessible as quickly as possible so should be packed right at the top of your backpack. These should always be the last items to go in.
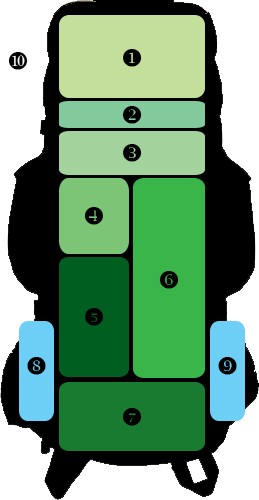
3. Food: Food should be near the top of your backpack with your lunch most accessible. This could be in a stuff sack or a container/bear canister.
4. Cooking equipment: You probably won’t need your cooking equipment until you stop for the evening so this can go in below your food. As it’s in the core part of the pack it’s also a good place for any other bulkier items. I keep things like my solar charger in here too.
5. Sleeping bag: Your sleeping bag is ideal next to your tent to balance the weight. It should always be inside another waterproof sack to keep it dry.
6. Tent: Pack your tent into your backpack first, as it’s likely to be the biggest item you carry. Place the tent in your pack vertically, against the part of the backpack that will be against your back. This will keep the weight of the tent close to your body. You could even consider breaking the tent down to spread the weight evenly.
7. Clothing: The bottom of the backpack is ideal for any clothing, inside another waterproof sack of course. Smaller clothing items can be used to pack out the spaces that don’t get filled (although, personally, I like things all in one place with fewer small items loose in my pack).
8. Fuel: Unless hiking in extremely hot conditions or in constant direct sunlight, fuel is usually best stored in an outside pocket. It can be kept vertical here and will do less damage if it leaks (consider keeping it in a plastic bag). Just remember it’s there before you throw down your pack!
9. Water bottle: This needs to be accessible throughout the day and it will also help to balance the weight of the fuel in the other pocket.
10. Loops and external points: Most packs have at least some special tool loops, fasteners or other storage solutions on the outside of the backpack. Items such as walking poles, axes, sleeping pads, rope or crampons can all be fixed on the outside. However, try to keep it to a minimum as it can all potentially snag on branches or scrape against rocks.
Enjoyed this post? pin it for later…